Setting up emails in Bp Event is a two-step process: first, set up an email server. Then, proceed to create email accounts for users or user groups.

  • Create an email server
    1. Go to the Administration  Administration tab in the function bar and select AdministrationAdministration Settings > Administration  General settings > E Mail Emails.
    2. Click on neu New to add an email server.
    3. Enter a unique, self-explanatory Name for the email server.
    4. Enter an OAuth 2.0 Sync Server.
      Note: If you use the OAuth procedure for authentication on the email server, a corresponding sync server must be set up.
    5. Enter the IP address / DNS name of the server dedicated to sending emails in the Outgoing mail server field.
      Note: Enter individual ports in IP:Port format (e.g. 127.0.0.1:25).
    6. Select SMTP encryption if necessary:
      a) Automatic (TLS)
      b) none
      c) SSL
    7. Tick SMTP authentication if required.
    8. Tick Send via server if emails must be sent from the IP address of the server in your system environment (exceptional case).
      Note: By default, emails are sent from the IP address of the Bp Event Client.
    9. Select a Type (receipt log)
      a) POP 3
      The emails are downloaded from the email server and can be deleted from the server immediately. If the emails are downloaded to another device, it is not possible to determine which emails have already been read or edited.
      b) IMAP
      The emails remain on the email server and are only synchronised. Emails that have been read or edited are also displayed on other devices. Individual mailbox folders can also be synchronised.
      c) IMAP Download
      Emails are downloaded from the email server using the IMAP protocol (similar to POP3).
    10. Activate the SSL/TLS encryption if the incoming mail server supports this.
    11. Set an individual Recycle bin folder (only possible with IMAP).
    12. Set an individual Spam folder (only possible with IMAP).
    13. Set a Sent folder if emails sent to the email server are to be displayed (only possible with IMAP).
    14. To delete emails directly from the server after loading, tick Delete emails after loading (only possible with POP 3).
    15. Specify the number of days after which the emails should be deleted in the Delete after column (only possible with POP 3).
    16. Speichern Save the settings.
  • Define further settings for emails
    1. Go to the Administration  Administration tab in the function bar and select AdministrationAdministration Settings > Administration  General settings > E Mail Emails.
    2. Tick Hide email in function bar if you do not want to use the Bp Event email functionality.
      Example: Bp Event users only send emails from Bp Event.
    3. Below the email servers, click on the button Schedule automatic mail download. Enter the desired retrieval series and save the setting.
      Note: Email retrieval is set for every 15 minutes by default.
    4. To display the outgoing emails of a user (and their groups) in another tab, tick Show sent-mail folder in mailbox.
    5. To prevent indiviual manual retrieval of emails when an email retrieval series has been set, tick Forbid manual email refresh.
    6. Note: Tick the Allow reloading email option only after consultation with the Bp Event Hotline or IT. This option allows users to reload emails that have already been downloaded.
    7. Tick Lock after sending to prevent emails that have already been sent from being changed (revision security).
    8. Speichern Save the settings.
  • Create email accounts for individual users

    Each user can have one or more user accounts.

    1. Go to the Administration Administration tab in the function bar and select BenutzerAdministration Users to open a Benutzer User record.
    2. Switch from the Benutzer  General tab to the e Mail Konto Email account tab.
    3. Click on neu New to add one or more email accounts.
    4. Enter the email user name for authentication in the Account user field. The email address itself is often used for this purpose.
    5. Enter the email password in the Password/Connect field.
    6. Select a Company (Multi-companies module) if you want to distinguish between companies for filing purposes.
    7. Enter the email address of the user.
    8. Enter a different email address in the Reply To field (if needed) to forward replies to that email address.
      Note: Sent emails will still show the user's email address as sender address.
    9. In the Alias field, enter a name that should be given to the recipient as the sender name.
      Note: This field defaults to the email address.
    10. Tick the column Senden to enable email delivery.
    11. If you want to send a blind copy of all outgoing emails from this account, enter an email address in the Send BCC field.
    12. Tick the column e mail monitor to enable email reception.
    13. Enter an individual Mailbox folder (only possible with IMAP).
    14. Enter an individual Recycle bin folder (only possible with IMAP).
    15. Enter an individual Spam folder (only possible with IMAP).
    16. Tick the column abwesenheits notiz to enable out-of-office notifications.
    17. Speichern Save your input by clicking on the icon in the top left-hand corner of the input window.
  • Create email accounts for user groups
    1. Go to the Administration Administration tab in the function bar and select BenutzerAdministration Users to open a Gruppen User group.
      Note: Use existing user groups or create new groups.
    2. Switch from the Tabellendetails  Authorisations tab to the e Mail Konto Email account tab.
    3. Click on neu New to add one or more email accounts.
    4. Enter the email user name for authentication in the Account user field. The email address itself is usually used for this purpose.
    5. Enter the email password in the Password/Connect field.
    6. Select a Company (Multi-companies module) if you want to distinguish between companies for filing purposes.
    7. Enter the user group Email address
    8. Enter a different email address in the Reply To field (if needed) to forward replies to that email address.
      Note: Sent emails will still show the user group's email address as sender address.
    9. In the Alias field, enter a name that should be given to the recipient as the sender name.
      Note: This field defaults to the email address.
    10. Tick the column Senden to enable email delivery.
    11. If you want to send a blind copy of all outgoing emails from this account, enter an email address in the Send BCC field.
    12. Tick the column e mail monitor to enable emails reception.
    13. Enter an individual Mailbox folder (only possible with IMAP).
    14. Enter an individual Recycle bin folder (only possible with IMAP).
    15. Enter an individual Spam folder (only possible with IMAP).
    16. Tick the column abwesenheits notiz to enable out-of-office notifications.
      Note: Out-of-office notes for user groups are only required in very rare cases. Use a formula for customised solutions.
    17. Speichern Save your input by clicking on the icon in the top left-hand corner of the input window.
  • Test the mailbox access data

    User and group mailboxes can be tested.

    1. Select the mailbox and click on Test access data.
    2. Bp Event will check the settings and send a notification of successful registration, sending and receiving.
  • Check the requirements for switching to OAuth 2.0

    Microsoft 365 requirements

    The user will need IMAP/POP3 and Authenticated SMTP authorisation for the email account in Microsoft 365.

    https://docs.microsoft.com/de-de/exchange/clients-and-mobile-in-exchange-online/authenticated-client-smtp-submission

  • Set up OAuth 2.0 in Bp Event

    Create a new Sync. Server

    1. Go to the Administration Administration tab in the function bar and select Administration Settings > Schnittstellen Interfaces > KalenderSync Synchronisation.
    2. neu Add a new Sync. Server with the type OAUTH2.
    3. Enter a unique name, we recommend "M365 OAUTH2".
    4. Select Microsoft 365 Email as server type.
    5. Tick the box Use default settings.
    6. Speichern Schliessen Save your input by clicking on the icon in the top left-hand corner of the input window.

    Store the new Sync. Server in the email settings

    1. Go to the Administration Administration tab in the function bar and select Administration Settings > > E MailEmails.
    2. To add the OAuth 2.0 Sync. Server to the Microsoft 365 email server, select the sync server you have just created from the picklist.
    3. Speichern Save your input by clicking on the icon in the top left-hand corner of the input window.

    Important: After setting up OAuth 2.0 authentication, the email accounts from Bp Event still need to be connected to Microsoft 365.

  • Link individual user email accounts with Microsoft 365

    Create a new Sync. Server

    1. Go to the Administration Administration tab in the function bar and select Administration Settings > Schnittstellen Interfaces > KalenderSync Synchronisation.
    2. neu Add a new Sync. Server with the type OAUTH2.
    3. Enter a unique name, we recommend "M365 OAUTH2".
    4. Select Microsoft 365 Email as server type.
    5. Tick the box Use default settings.
    6. Speichern Schliessen Save your input by clicking on the icon in the top left-hand corner of the input window.

    Store the new Sync. Server in the email settings

    1. Go to the Administration Administration tab in the function bar and select Administration Settings > > E MailEmails.
    2. To add the OAuth 2.0 Sync. Server to the Microsoft 365 email server, select the sync server you have just created from the picklist.
    3. Speichern Save your input by clicking on the icon in the top left-hand corner of the input window.

    Important: After setting up OAuth 2.0 authentication, the email accounts from Bp Event still need to be connected to Microsoft 365.

  • Link user group email accounts with Microsoft 365

    Important: After setting up OAuth 2.0 authentication, the email accounts from Bp Event still need to be connected to Microsoft 365.

    1. Go to the Administration Administration tab in the function bar and select Benutzerexpand Users > Benutzer User Groups > suche Search.
    2. Open the user group you want.
    3. Go to the e Mail Konto Email account tab.
    4. To connect the email account stored there with Microsoft, click on Connect in the Password/Connect column. The standard web browser will open with a login screen.
    5. Authenticate yourself in the Microsoft dialogue with the same email account as in Bp Event.
    6. Following successful authentication, the following authorisations must be accepted:
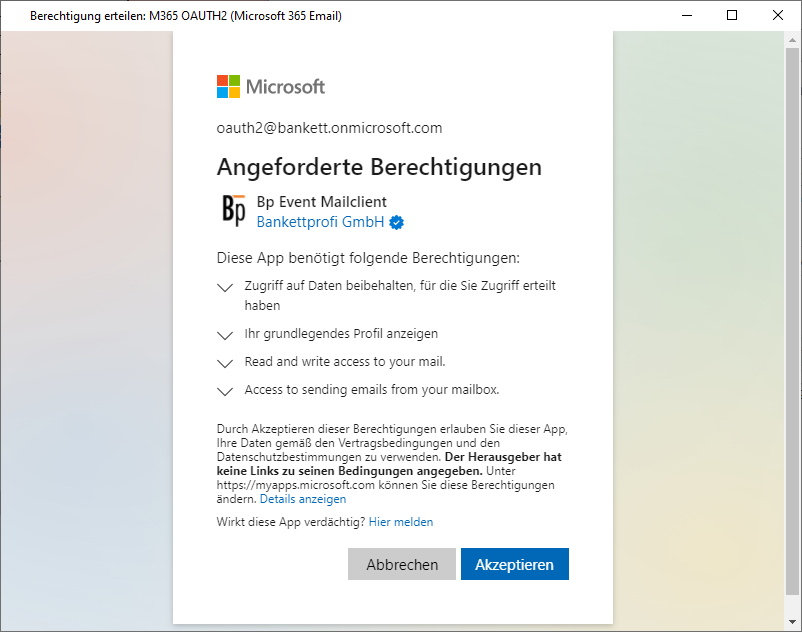
    Office Berechtigungen akzeptieren

    1. After confirming the authorisations, you will be automatically logged out of the web browser.
    2. Confirm the message in BP Event to grant the rights.
    3. Confirm the message "The authorisation code could be determined" by clicking OK.
    4. Carry out the test for the email configuration. The setup is now complete.
  • Hits: 17

If changes have been made to a WebApp or Bp Event Mobile or if they cannot be called up, the web server needs to be be restarted.

  1. Go to the hilfe Help tab in the function bar and select Wartung Maintenance > Monitor Service Client.
  2. Click on Ausfuehren  Restart Web Server. The info lines (Started, Prot, Directory) are cleared on restart. The web server starts with the updated information.

  • Hits: 16

Setting up change notificationsM

As of version 121f23, all predefined changes to records can be communicated to users or user groups using the Calendar Synchronisation module or the Export interface. User are automatically notified of changed appointments, events and/or shifts by email, task, internal message or any other channel of communication.

Custom sample scenarios with text templates, lists and default settings for setting up the change notifications are available. Individual customisations can be made at any time.

Set the following:

  • Calendar Synchronisation
  • Info centre list(s)
  • Text template type Info Centre data
  • Sync Server
  • Sync tables
  • Sync Server accounts
  • Jobs
  • Email sending account

  • Important information for setting up change synchronisation (for system administrators)
    1. Calendar synchronisation must be configured in advance.
    2. If change synchronisation is set up in an existing database, a change stamp can be imported into all existing records using a data maintenance list in the change log. This means that the notifications are sent as change notifications and not as new records.
    3. If data needs to be updated without triggering a notification, the number -1 can be temporarily entered in the Sync tables in the Notification from "X days before" field.
    4. The heading of the export list (Type: Info Centre list) is copied as the subject of the notification.
    5. The Info Centre export list requires a real start date as a filter (e.g. the create date). "Current Date" cannot be used here, as this reference changes daily.
  • Create a notification concept

    Clarify the following questions before starting to set up change synchronisation:

    1. Which record changes should be communicated?
    • Events
    • Appointments
    • Inventory/Shift
    • Tasks
    • Contacts
    • Work times
    • Purchase Deliveries
    • Holidays/Special Events
    • Projects
    • Event schedules
    • Event rooms
    • Event segments
    1. Who should be notified of any changes?
      Individual users, user groups or persons without Bp Event access
    2. How should the change be communicated?
      Email, internal message, SMS, task, start job
    3. What should the notification say?
      Before and after info, formatting
    4. How often should the change validation be carried out?
      Every 5 minutes, hours etc.
  • Create an export list (Type: Info Centre list)

    The Info Centre list provides the subject and content of the change notification. The text checks all data that can trigger an action in the event of a change. With each job run, this data is checked for changes and triggers an action if necessary. The Info Centre list is assigned as an export list in the sync table.

    1. Create a new list. ()
    2. Select the Use "Info Centre list".
    3. Enter the subject of the notification (email, internal message or task) in the formula To Do Heading field.
    4. Enter the body of the message in the formula To Do Detail field.
  • Create a text template for the change notification

    The Info Centre text template determines the content of the change notification. The changes can be made more readable for the recipient by using formatting and style sheets. ()

    1. Create a new text template or copy an existing template.
    2. Select the template Type "Info centre data".
    3. Click on the expand triangle next to Bezuege einfuegenexpand Insert references and select Insert expression [Text]
    4. Select the Sync Server notification details function from the right-hand column.
      Sync notification
      Note: This expression outputs the information from the formula To Do Detail (from the Info Centre list). The parameter "new" returns the current text after the change, the parameter "old" returns the original content before the change.
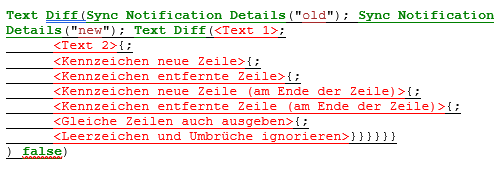
    5. To clarify the changes in the text, the above formula can be supplemented with the function "Compare texts".
      Example:
      Text Diff
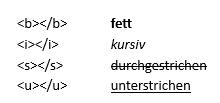
    6. The different results from the formula in word processing can also be formatted.
      Formatting options:
      Formatierung
    7. The formula including predefined styles (link) will look like this in word processing:
      Stil
  • Create a sync server

    Sync servers set the sender of the change notifications and schedule the jobs. Separate sync servers are required for different intervals and contexts.

    1. Go to the Administration Administration tab in the function bar and select Administration Settings > KalenderSync Synchronisation.
    2. neu Add a new Sync. Server and select Sync Server Notification. The sync server input field will open.
    3. Enter a unique, self-explanatory Name for the sync server.
    4. Enter unique title prefixes for notifications
      a) New -> Example "New shift"
      b) Changed -> Example "Changed shift"
      c) No longer current -> Example "Cancelled shift"
    5. Enter a Send address for emails.
    6. <attribute not present> Save your input by clicking on the icon in the top left-hand corner of the input window.
  • Create a sync table

    Sync tables set the framework conditions and the content of the change notification.

    1. Go to the Administration Administration tab in the function bar and select Administration Settings > Administration Synchronisation.
    2. neu Add a new Sync. Table and select Sync Server Notification at xx.
      Note: The available Sync. Server will be offered for selection.
    3. Enter a unique, self-explanatory Name for the sync table or use the server name (recommended).
    4. Select the data source from the picklist.
      Note: Only data with a date or time reference are available.
    5. Assign the export list (Type: Info Centre list).
    6. Enter a time range in minutes as Export delay. This time determines how long after saving a record the change notification will be sent.
      Note: Make sure that the server, name, data source, export list and text template have the same objectives.
    7. Make the following settings:
      a) Notify responsible users / user group
      Only the Sync Server accounts of type user or user group are notified. Each user account only receives the data relevant to them.
      Example: User "Smith" only receives notifications about changes to appointments that affect them as participant or responsible.
      b) Notify staff members individually
      Only the Sync Server accounts of type "Staff member" are notified.
      Example: User "Smith" receives change notifications for their own shifts.
      c) No selection Only the sync server accounts of type "Sync server account" and "Distribution list" are notified. These can be used to notify stakeholders who are not Bp Event users.
      Example: Event changes are communicated to various departments and an external caterer.
    8. Set as the number of days before the reference date (e.g. event date) that the notification should be sent as Notification lead time.
      Example: With a lead time of 14 days, recipient will not be notified of any changes made three weeks before the event. This reduces the information load.
    9. The Max. failed attempts defines how often the notification function may fail before execution is cancelled.
    10. Select a Text template for the notification text.
    11. Select attachments in the Data sheet as email attachment field, such as updated worksheets (created as text data sheet) for an event.
    12. Tick Attach ICS files to include calendar entries in the attachment.
      Example: The event date has been postponed, an updated calendar entry is included in the email.
      Note: The form and content of the calendar entry cannot be customised.
    13. To log whether a notification has been sent in the change history of the record, tick Log to record.
      Note: Logging may generate a large amount of data and should be selected with care.
    14. Click on Discard data and reload in the event of changes, e.g. in the text template or the export list of the Info Centre type, to avoid triggering a change notification for all affected records.
      Note: All changes are reloaded (reset) without triggering change notifications. Please use with caution.
    15. Show synchronised data is used during setup or error analysis. Calls up a list of all records affected by changes and provides information on synchronisation.
    16. Show unsynchronised data lists all changes that can trigger a notification during the next synchronisation, provided they qualify for the notifications (job).
      Note: Neither the export list (Type: Info Centre list) nor the number of days for the notification are considered here.
    17. Test export list with unsynchronised data can be used for testing during setup.
  • Create a sync server account

    Sync accounts determine the recipient(s) of the change notifications.

    1. Go to the Administration Administration tab and select Administration Settings > Sync Synchronisation to create a new sync server account.
    2. Click on the expand triangle next to neuexpand Add and select Notification at xx ->
      a) Gruppen User group
      Select a user group to be notified of changes.
      Example: If a responsible user responsible needs to be notified of changes event changes, this user must be assigned to the group.
      b) Benutzer User
      c) personal Staff member
      d) Sync Server Konto Sync. Server account
      Example: The external caterer does not work with Bp Event and is notified by email about changes to the event.
      Not only the person responsible for an event or an event participant can be informed, but also other stakeholders who have no access to Bp Event.
      e) Verteilerliste Distribution list (email, internal messages)
    3. The Sync Server input window will open.
    4. Enter a unique, self-explanatory Name for the sync server.
    5. Select a Channel (email, SMS, job) from the picklist.
  • Create a job for the sync server update

    The job determines the time interval in which the changes are checked.

    1. Go to the Einrichtung Configurations tab on the function bar and select Jobexpand Jobs > neu New.
    2. Enter a unique and self-explanatory Name and Job title .
    3. Select the Type "Update Sync Server".
    4. Enter a Start time/condition .
    5. Select Execute as to execute the job with the authorisations of the selected user or group.
    6. Assign a sync server in the Sync. Server Name field.
    7. <attribute not present> Save your input by clicking on the icon in the top left-hand corner of the input window.

    ()

  • Hits: 17

E-invoicing is included in Bp Event as of version 12.2f04. Customised settings are possible within the scope of legal requirements.

E-invoicing in 5 steps:
Step 1 Update* to the latest version (no earlier than 12.1p25)
Step 2 Load scenario
Step 3 Activate e-invoice and enter payment account
step 4 Show the VAT category in a custom segment view
Step 5 Check and make the necessary adjustments to the invoice text template

As soon as the e-invoice has been enabled in the administration and an e-invoice payment account has been entered, further fields are available on the customer account Added Fields tab.

Important:

E-invoicing has been seamlessly integrated into Bp Event in accordance with all applicable legal requirements. In the “Invoice (E-Invoice)” template, all content from the XML file is also displayed in the PDF file. Decide for yourself whether to use the new template (recommended) or have your existing e-invoice template customized. Please contact your account manager for assistance.

Read more on Generating an e-invoice.

* Read more on Automatic Updates.

  • Load the scenario

    Once your database has been updated to a current version (at least 12.1p25), you can load the integrated e-invoice scenario automatically.

    1. Log in to the database as Administrator.
    2. Go to the Administration  Administration tab in the function bar and select Administrationexpand Settings > Administration  General settings > Lizenzen Licences.
    3. Tick the box for E-invoice.
    4. Speichern Save your input by clicking on the icon in the top left-hand corner of the input window.
    5. Click on Actions > Load Bp scenarios now > Load without enforcing.
    6. speichern schliessen Save and close to close the input window.
  • Enable e-invoicing and set up an e-invoice payment account

    A user with administrative authorisations can enable the e-invoice.

    1. Go to the Administration Administration tab in the function bar and select Administrationexpand Settings > Rechenblatt Invoicing.
      Note: In the case of a multi-company database, you will find invoice management in the respective company profile.
    2. Tick the box for E-invoice.
    3. Select the E-invoice payment account intended for the incoming payments from the list.
      Note: Select a bank account with IBAN from the list of available payment accounts.
  • Insert the VAT category in a custom segment view

    Add the VAT category to a custom view of booked items for easy changes per booked item. Administrative permissions are needed to edit custom views for booked items.

    1. Go to the Administration Administration tab in the function bar and select Administrationexpand  Settings > VA  Events > Vorgang Artikel Booked items.
      Note: In the case of a multi-company database, the setting for the individual booked item views are included in the respective company profile.
    2. Decide which of the Custom views (1-5) is suitable for showing the VAT category and enter a unique and self-explanatory name for the view.
    3. neu Add the VAT category and drag-and-drop it to the position you want.
    4. Speichern Save your input by clicking on the icon in the top left-hand corner of the input window.
      Note: The VAT category column is displayed in the event segment if:
      - the booked items view contains the VAT code
      - the event segment is an invoice
      - the invoice recipient is qualified for e-invoicing
  • Add nationality codes in accordance with the standard

    The country codes entered in the address picklist do not always correspond to the mandatory "ISO 3166-1 Alpha-2" standard for the e-invoice (XML file).
    Example: For Germany, the ISO code is DE (not D, D- or DE-).
    The "ISO country code (Alpha-2)" mapping ensures that the different notations of the country codes in the address are translated into the correct standard.

    Check the country codes in advance using an Info Centre list in your database. Click on  infocenterexpandInfo Centre < open E-invoice Einrichtung > Adresse Verwendete Länderkürzel  to see the codes already in use.

    1. Go to the  Einrichtung Configurations tab in the function bar and click on  Funktion Mappings > ISO country code (Alpha-2).
    2.  neu Add more country codes as needed.
    3. Enter the various notations of your country codes in the column From .
    4. Enter the appropriate "ISO 3166-1 Alpha-2 Code" in the column To .
      Examples:
      From        To
      FR-        FR
      F-           FR
      IT-          IT
      I-            IT
      Note: You can find the codes at https://www.laenderdaten.info/laendercodes.php
    5. Speichern Save and close the mapping

    Important: The line with the asterisk (*) as a placeholder for missing values must always remain the last line. Insert new entries above this line.

  • Add codes for units of measure

    The unit of measure must be specified in the e-invoice. This is output as a code in the electronic invoice (XML file). The "Sales unit to code" mapping ensures that the sales unit of the item is translated into the correct codes without having to process all items individually.
    If there is no sales unit, the mapping can use the sales content unit instead, provided the sales content is 0 or 1.

    Check the units of measure in advance using an Info Centre list in your database. Click on  infocenterexpandInfo Centre < open E-invoice Einrichtung > Adresse Verwendete VK- Gebinde und-Einheiten  to see the units already in use.

    1. Go to the  Einrichtung Configurations tab in the function bar and double-click on > Funktion Mappings > Sales unit to Code.
    2. neu  Add more units as neded.
    3. In the column From, enter the various notations of the sales units.
    4. Enter the appropriate "Code" in the column To .
      Examples:
      From        To
      Bottle   XBO
      Glass      XCU
      Litre      LTR
      Metre    MTR
      Note: The codes are defined in UN/ECE Recommendation No. 20 "Codes for Units of Measure Used in International Trade". LINK https://unece.org/trade/documents/session-documents/codes-units-measure-used-international-trade-recommendation
    5. Speichern Save and close the mapping

    Important: The line with the asterisk (*) as a placeholder for missing values must always remain the last line. Insert new entries above this line.

  • Change terms in the e-invoice

    A mapping allows you to customise the labelling and formatting of the fields listed below in the e-invoice. The ‘From’ column shows the standard label. The ‘To’ column is where you enter your own label and formatting. This must be written in the following format:

    <Label>;<Separator between label and value>;<Paragraph mark after value>;<Label style>;<Value style>;<Original language>;<Target language>

    Example: Department;tab;cr;body text in bold;body text
    Tab = Tabulator
    cr = line break

    Use the copy guide in the table below and customise the terms and style as required.

    1. Go to the  Einrichtung Configurations tab in the function bar and select Funktion Mappings > E-invoice terminology ("E-Rechnung Begrifflichkeiten").
    2. Click on neuNew to insert the field you wish to rename or format.
    3. In the column ‘To’, enter the new term/style following the example provided.
    4. SaveSave and close the mapping
    Term "From" Term ‘To" (copying aid)
    Department Department;tab;cr;body text in bold;body text
    Attachment Attachment;tab;cr;body text in bold;body text
    Occasion Purpose;tab;cr;body text in bold;body text small *
    Contact CON;tab;cr;body text in bold;body text small *
    Amount Amount;tab;cr;body text in bold;body text
    On-account invoice no. On-account invoice No.;tab;cr;body text in bold;body text
    Item Item;tab;cr;body text in bold;body text
    Bank Bank;tab;cr;body text in bold;body text
    Order number Order number;tab;cr;body text in bold;body text
    BIC BIC;tab;cr;body text in bold;body text
    Booking reference Booking reference.;tab;cr;body text in bold;body text
    Unit price Unit price;tab;cr;body text in bold;body text
    Email Email;tab;cr;body text in bold;body text
    contains contains;tab;cr;body text in bold;body text
    Container Container;tab;cr;body text in bold;body text
    Total Total;tab;cr;body text in bold;body text
    Business process Business process;tab;cr;body text in bold;body text
    Creditor ID Creditor ID;tab;cr;body text in bold;body text
    Global ID (schema) Global ID (schema);tab;cr;body text in bold;body text
    IBAN IBAN;tab;cr;body text in bold;body text
    ID ID;tab;cr;body text in bold;body text
    Account Account;tab;cr;body text in bold;body text
    Corrected invoice No. Corrected invoice No.;tab;cr;body text in bold;body text
    Customer number Customer number;tab;cr;body text in bold;body text
    Route ID Route ID;tab;cr;body text in bold;body text
    Delivery address Delivery address.tab;cr;body text in bold;body text
    Supplier ID Supplier ID;tab;cr;body text in bold;body text
    Client reference Client reference.;tab;cr;body text in bold;body text
    VAT-exempt on net amount VAT exempt on net amount;tab;cr;body text in bold;body text
    VAT on-account VAT;tab;cr;body text in bold;body text
    VAT VAT;tab;cr;body text in bold;body text
    VAT on net amount VAT on net amount;tab;cr;body text in bold;body text
    Number Number;tab;cr;body text in bold;body text
    Outstanding gross invoice amount Outstanding invoice amount;tab;cr;body text in bold;body text
    Pos. Pos.;tab;cr;body text in bold;body text
    Invoice No. Invoice No.;tab;cr;body text in bold;body text
    Gross invoice amount Gross invoice amount;tab;cr;body text in bold;body text
    Invoice number Invoice No.;tab;cr;body text in bold;body text
    Reference doc. info Reference documents info.;tab;cr;body text in bold;body text
    Reference doc. no. Reference documents no.;tab;cr;body text in bold;body text
    Reference doc. URL Reference documents URL;tab;cr;body text in bold;body text
    Reference documents Reference documents;tab;cr;body text in bold;body text
    SEPA Direct Debit SEPA Direct Debit;tab;cr;body text in bold;body text
    Gross total Gross total;tab;cr;body text in bold;body text
    Net total Net total;tab;cr;body text in bold;body text
    Phone Phone;tab;cr;body text in bold;body text
    VAT exemption reason Reason for VAT exemption;tab;cr;body text in bold;body text
    VAT IN VAT IN;tab;cr;body text in bold;body text
    VAT category VAT category;tab;cr;body text in bold;body text
    VAT IN/Tax invoice issuer VAT IN/Tax number of the invoice issuer;tab;cr;body text in bold;body text
    Organiser Organiser;Tab;cr;body text in bold;body text
    Event date Event date;tab;cr;body text in bold;body text
    Purpose Purpose;tab;cr;body text in bold;body text
    Linked on-account invoice Linked on-account invoice;tab;cr;body text in bold;body text
    Linked on-account invoices Linked on-account invoices;tab;cr;body text in bold;Body text
    for Invoice No.

    Invoice No.;Tab;cr;Body text in bold;Body text

    * Two examples of rewording and formatting

  • Hits: 16

Importing public holidays/special events

Previously, public holidays for Germany could be created annually using the Holidays/Special Events moduleM. As of version 12.1R12, public holidays can be imported across countries and in multiple languages. The public holidays are imported from an external source, OpenHolidays API https://www.openholidaysapi.org/de/, using a data maintenance list. The user can therefore still make individual decisions during import.

  • Load the scenario

    Once your database has been updated to a current version (at least 12.1p25), you can load the integrated e-invoice scenario yourself.

    1. Log in to the database as Administrator.
    2. Go to the Administration  Administration tab in the function bar and select Administrationexpand Settings > Administration  General settings > Lizenzen Licences.
    3. Tick Import public holidays from www.openholidays.org.
    4. Speichern Save your input by clicking on the icon in the top left-hand corner of the input window.
    5. Click on Actions > Load Bp scenarios now > Load without enforcing.
    6. speichern schliessenSave your input by clicking on the icon in the top left-hand corner of the input window.
  • Authorise users to import events
    1. Go to the Administration Administration tab in the function bar and select BenutzerAdministration Users > Benutzer User Groups
    2. Open the user group ER_Import.
    3. Go to the Benutzer Users/Groups tab and neu Add the users or groups that you want to authorise for importing holidays/events in future.
    4. speichern schliessen Save and close the authorisation.
  • Import public holidays/special events
    1. Go to the Einrichtung  Configurations tab in the function bar and select Ereignis Holidays/Special Events > import  Import > Ereignis ER_Import-Feiertage.
    2. Determine which public holidays to import.
      a) Company (Multi-Companies module)M
      Example: Your corporation has sites in Germany, Belgium and Switzerland. Determine which holidays should be imported per country.
      - Which company?
      - Which language?
      Note: only if the country code is not "DE". The language is taken from the country setting mapping ISO country code (Alpha-2).
      - Which date range to import
      Note: If there are several companies with the same country setting, apply your selction to all of them by confirming the message "There are several companies in the same country. Do you want to copy the events to other companies?" by clicking Yes and ok  Confirm for the selected companies.

      b) Other country
      Note: Without the Multi-companies module, no queries will appear. The default setting is "Other country".
      Example: Your company is located close to the French border and is directly affected by French public holidays. You might want to import French public holidays (in the respective national language if necessary).
      - which language to import
      - which country to import
      - which federal state to import
      - which date range to import
      - which language to use for the name of the special event
    3. A data maintenance list will open.
      Note: Tables with a grey background are excluded from changes. If necessary, make changes in the column per federal state (white background).
    4. To exclude individual rows from the import, remove the tick in the first column.
    5. To import data, click on Speichern Save in the top left-hand corner.
  • Hits: 17

Once your database has been updated to a current version (at least 12.1p25), you can load the integrated e-invoice scenario yourself.

  1. Log in to the database as Administrator.
  2. Go to the Administration  Administration tab in the function bar and select Administrationexpand Settings > Administration  General settings > Lizenzen Licences.
  3. Tick Import public holidays from www.openholidays.org.
  4. Speichern Save your input by clicking on the icon in the top left-hand corner of the input window.
  5. Click on Actions > Load Bp scenarios now > Load without enforcing.
  6. speichern schliessenSave your input by clicking on the icon in the top left-hand corner of the input window.
  • Hits: 18
  1. Go to the Administration Administration tab in the function bar and select BenutzerAdministration Users > Benutzer User Groups
  2. Open the user group ER_Import.
  3. Go to the Benutzer Users/Groups tab and neu Add the users or groups that you want to authorise for importing holidays/events in future.
  4. speichern schliessen Save and close the authorisation.
  • Hits: 19
  1. Go to the Einrichtung  Configurations tab in the function bar and select Ereignis Holidays/Special Events > import  Import > Ereignis ER_Import-Feiertage.
  2. Determine which public holidays to import.
    a) Company (Multi-Companies module)M
    Example: Your corporation has sites in Germany, Belgium and Switzerland. Determine which holidays should be imported per country.
    - Which company?
    - Which language?
    Note: only if the country code is not "DE". The language is taken from the country setting mapping ISO country code (Alpha-2).
    - Which date range to import
    Note: If there are several companies with the same country setting, apply your selction to all of them by confirming the message "There are several companies in the same country. Do you want to copy the events to other companies?" by clicking Yes and ok  Confirm for the selected companies.

    b) Other country
    Note: Without the Multi-companies module, no queries will appear. The default setting is "Other country".
    Example: Your company is located close to the French border and is directly affected by French public holidays. You might want to import French public holidays (in the respective national language if necessary).
    - which language to import
    - which country to import
    - which federal state to import
    - which date range to import
    - which language to use for the name of the special event
  3. A data maintenance list will open.
    Note: Tables with a grey background are excluded from changes. If necessary, make changes in the column per federal state (white background).
  4. To exclude individual rows from the import, remove the tick in the first column.
  5. To import data, click on Speichern Save in the top left-hand corner.
  • Hits: 18

Printer settings relate specifically to the settings on the printer itself.

  1. Go to the Vorlagen  Templates tab and select Ausgabevorlagenexpand  Printer settings > > neu New.
  2. Give the new printer setting a descriptive Name and enter a more precise Description if necessary.
  3. Define the default values for this printer setting:
    1. Printer: Name of the Printer (from the picklist) for this setting. This can also be a fax or a PDF output.
    2. Shaft: automatic or manual
    3. Modus: einseitig oder doppelseitig
    4. For a receipt printer, tick the option Receipt printer and enter the External name of the receipt printer if necessary.
  4. Speichern Save  your input.


  • Hits: 19

Output settings are used for many different printed materials and must be set up accordingly.

  1. Go to the Vorlagen  Templates tab and select Ausgabevorlagenexpand  Output settings > > neu New.
  2. Give the new output setting a descriptive Name and enter a more precise Description if necessary.
  3. Enter watermarks in PDF format in the PDF area for documents by email.
    1. Click on DokumentenAblage Listeexpand Document > suche Search to the right of Watermark Page 1 or Watermark Subsequent pages
    2. To limit the search results, enter "Shared documents" as Filing location and confirm your entry by clicking suche Search.
    3. Select a stationery document from the list of document packages by double-click.
    4. If the input fields for Landscape format are empty, the previously specified format (regardless of whether portrait or landscape format) is retained. An entry in the "Landscape format" field only comes into effect if there are actually pages in landscape format in a document.
  4. In the field Password protection, optionally enter a password that the recipient must know in order to open the document. This prevents unauthorised reading of documents.
  5. Enter style sheets and/or watermarks as templates or images in the Word processing area for text documents that are printed out.
    1. Select a Style sheet template to apply to all text documents with this output setting. These are templates of the type "Text module". (Creating a text template)
    2. Click on Album expand Gallery > suche  Search to the right of Watermark Page 1 or Watermark Subsequent pages
    3. To limit the search results, enter categories if necessary and confirm your entry by clicking suche Search.
    4. Select an image from the list of gallery images by double-click.
    5. If the input fields for Landscape format are empty, the previously specified format (regardless of whether portrait or landscape format) is retained. An entry in the "Landscape format" field only comes into effect if there are actually pages in landscape format in a document.
  6.  In the lower input window, select the Print settings for this output setting. (Setting up print settings)
  7. Speichern Save  your input.


  • Hits: 20